Howto Setup and use the CuckooVM v2
This post should cover the basics of how to import and run a basic analysis using the Cuckoo VM which could be found here. I’m referring to this VM as CuckooVM version 2, since if you’ve been following, you already know that I have shared a previous version of this CuckooVM which I configured. Even if you do not do malware analysis or digital forensics and incident response, this VM could come handy and useful to you, so please do not skip just because you’re not working in those areas.
Now, in order to use the Cuckoo Sandbox which I think many of the online service providers today have their systems built around Cuckoo (no proof to this claim!), you will need a dedicated machine. The installation process itself is also not simple for some, but it could be a piece of cake to others (not saying it is for me!), so this VM could save you the trouble of:
Need to purchase or dedicate a whole machine for Cuckoo (it is worth though!)
Need to go through the installation process
Before moving forward, if any of the figures below is not clear, just click on it to enlarge it.
INTRODUCTION
The Cuckoo VM is running Cuckoo in what is called a “Nested Virtualization”. What that means, well first let’s check this general architecture as seen in figure 1.1.

Figure 1.1 – General Architecture
Now if you check figure 1.2 below, this is how I have Cuckoo installed. Yes, Cuckoo VM is the one with Ubuntu 16.04 and inside this VM, I have VirtualBox installed with a Windows 7 VM already installed and configured. This Windows 7 VM is the one that Cuckoo will be using to submit samples to and do the analysis. You can add other VMs to the system such as Windows 10, I will explain how to do that in another post, but this post should get your VM up and running.
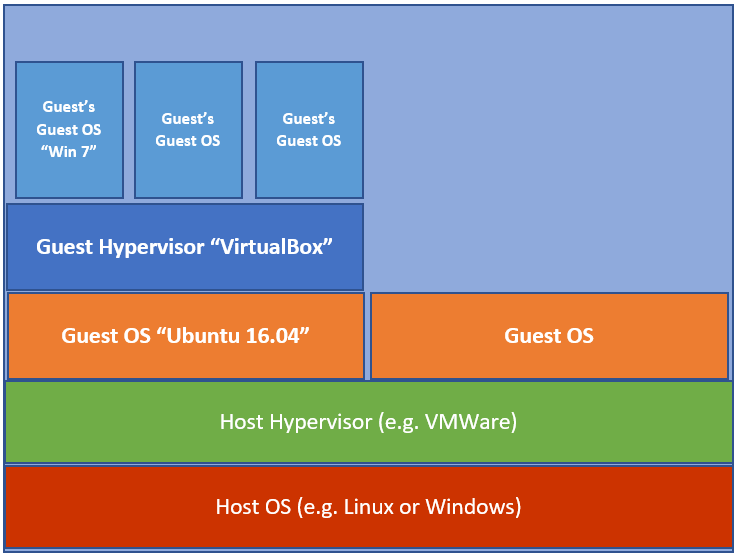
Figure 1.2 – CuckooVM Architecture
Now, if my figures and explanation is not enough about Nested Virtualization, then I think this reference might help!
THE SETUP
First start your hypervisor, in the figures coming next, I’m showing this with a VMWare Workstation, but it should be similar if you’re using other hypervisors.
Go to File –> Open and you should get a menu similar to the one in figure 2.3. Navigate to the location where the OVA file is stored and select it. This should start the import process, just follow the wizard and select where you want to store the VM.
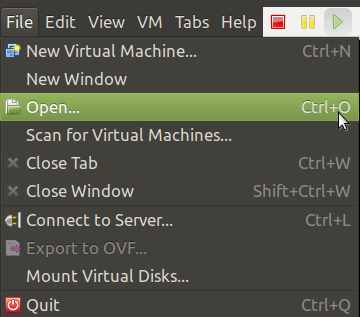
Figure 2.3 – Open an OVA File
3.The minimum Physical RAM required should not be less than 8GB for the CuckooVM as seen in figure 2.4. It would be good to give 16GB or even more. Also, as you can see from figure 2.4, the network interface for this VM is on NAT, you can switch it to Bridge if you want, but you know what that means :)
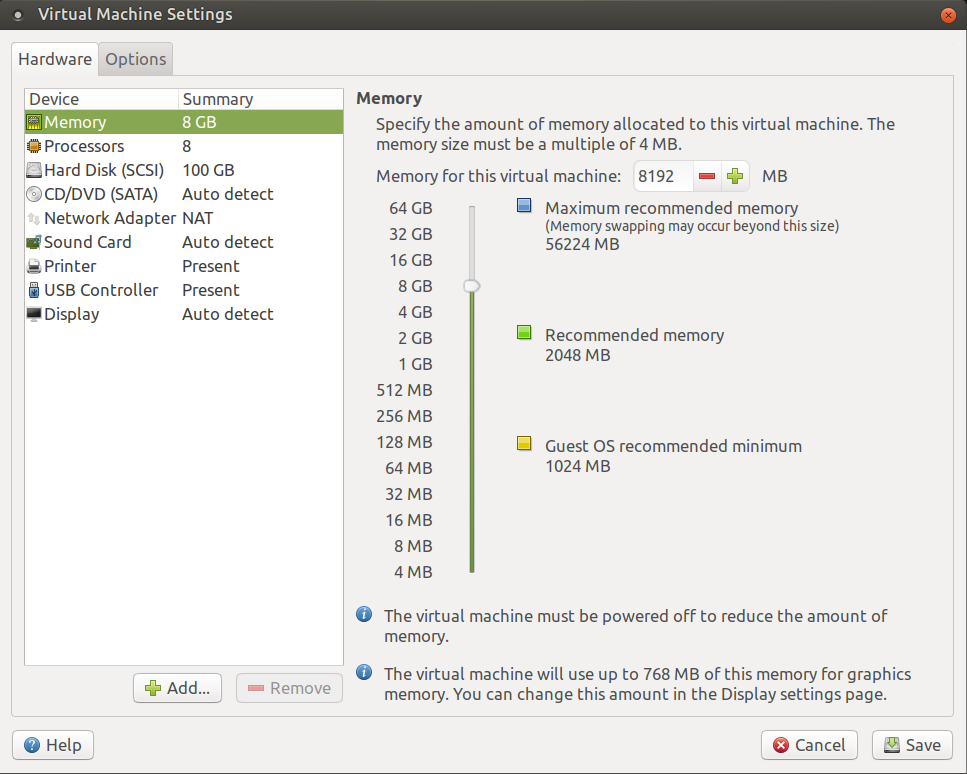
Figure 2.4 – Minimum Physical RAM Required
- We are now ready to power up the VM, so what are you waiting for? Yes, start the VM and login using the credentials below:
Username: cuckoo
Password: forensics
Before we start Cuckoo, I just want to show you how internally the VM is configured. If you check figure 2.5, you can see the network configuration for both ens33 (interface using NAT by Ubuntu system) and vboxnet0 (interface used by VMs). The Windows 7 VM inside is using a host-only network as seen in figure 2.6.
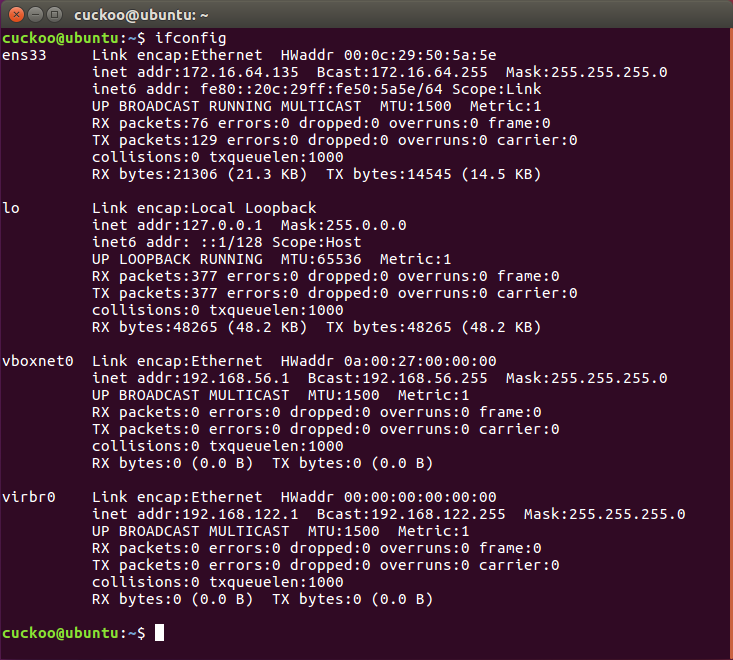
Figure 2.5 – CuckooVM Network Configuration

Figure 2.6 – Windows 7 using Host-only Network
The network configuration of the Windows 7 VM could be seen in figure 2.7 and it was setup this way, so the VM can access the Internet.

Figure 2.7 – Windows 7 Network Configuration
- Now let’s start playing with Cuckoo. Open one terminal with two tabs (or two separate terminals) and then in the first terminal type “cuckoo -d” as seen in figure 2.8. You can also see the ASCII art for the word “cuckoo” with the version number of Cuckoo we are running.
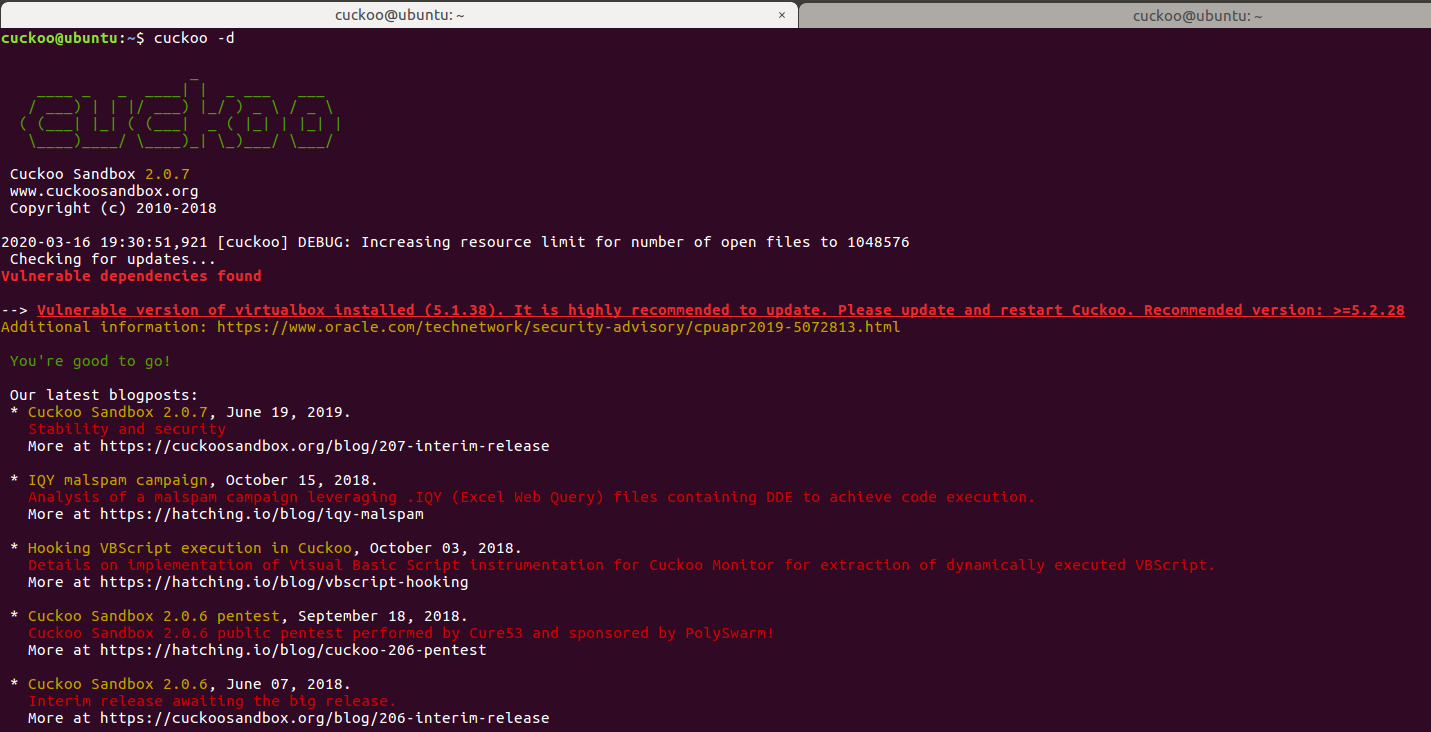
Figure 2.8 – Starting Cuckoo Service
- Now in the second terminal type “cuckoo web” as seen in figure 2.9.

Figure 2.9 – Starting Cuckoo Web Interface
- Click on the URL seen in figure 1.10 to open Firefox with the main web interface of Cuckoo as seen in figure 2.10.
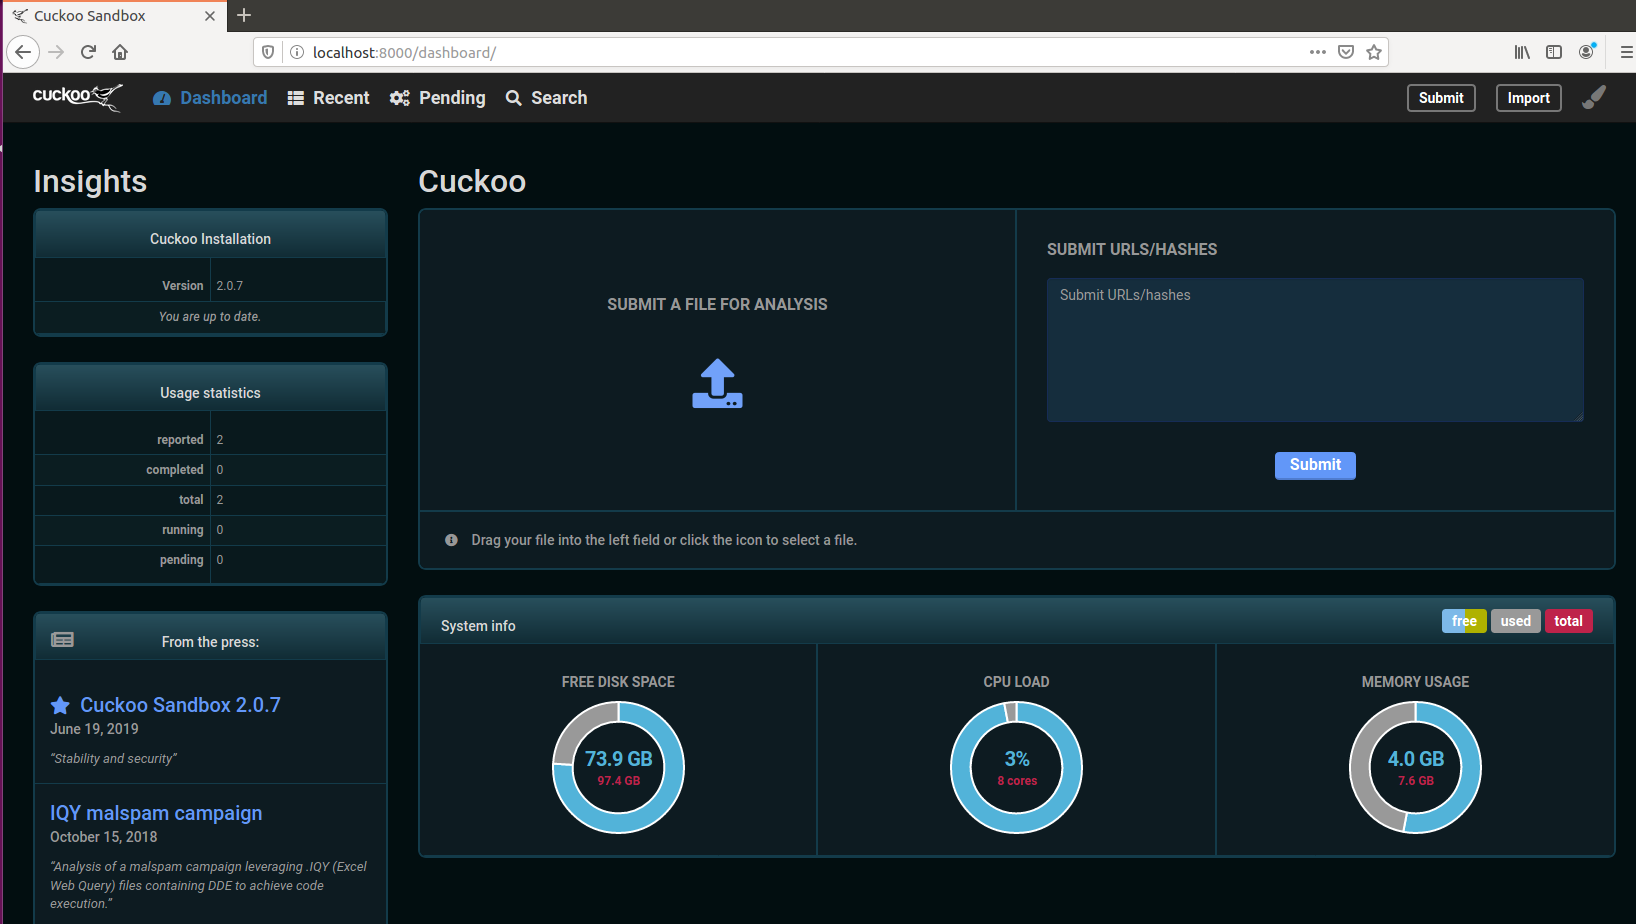
Figure 2.10 – Cuckoo’s Web Interface
And now we have our Cuckoo VM up and running and ready for the next part, which is to submit a sample and let Cuckoo do it’s job…
SUBMITTING SAMPLES FOR ANALYSIS
- Click on the arrow on the main page, where it says “SUBMIT A FILE FOR ANALYSIS” and then navigate to the location where you have the file you want to analyze and select it. This should bring you to the analysis configuration page as seen in figure 3.1. Select the settings you want and then click on the blue Analyze button to the right.
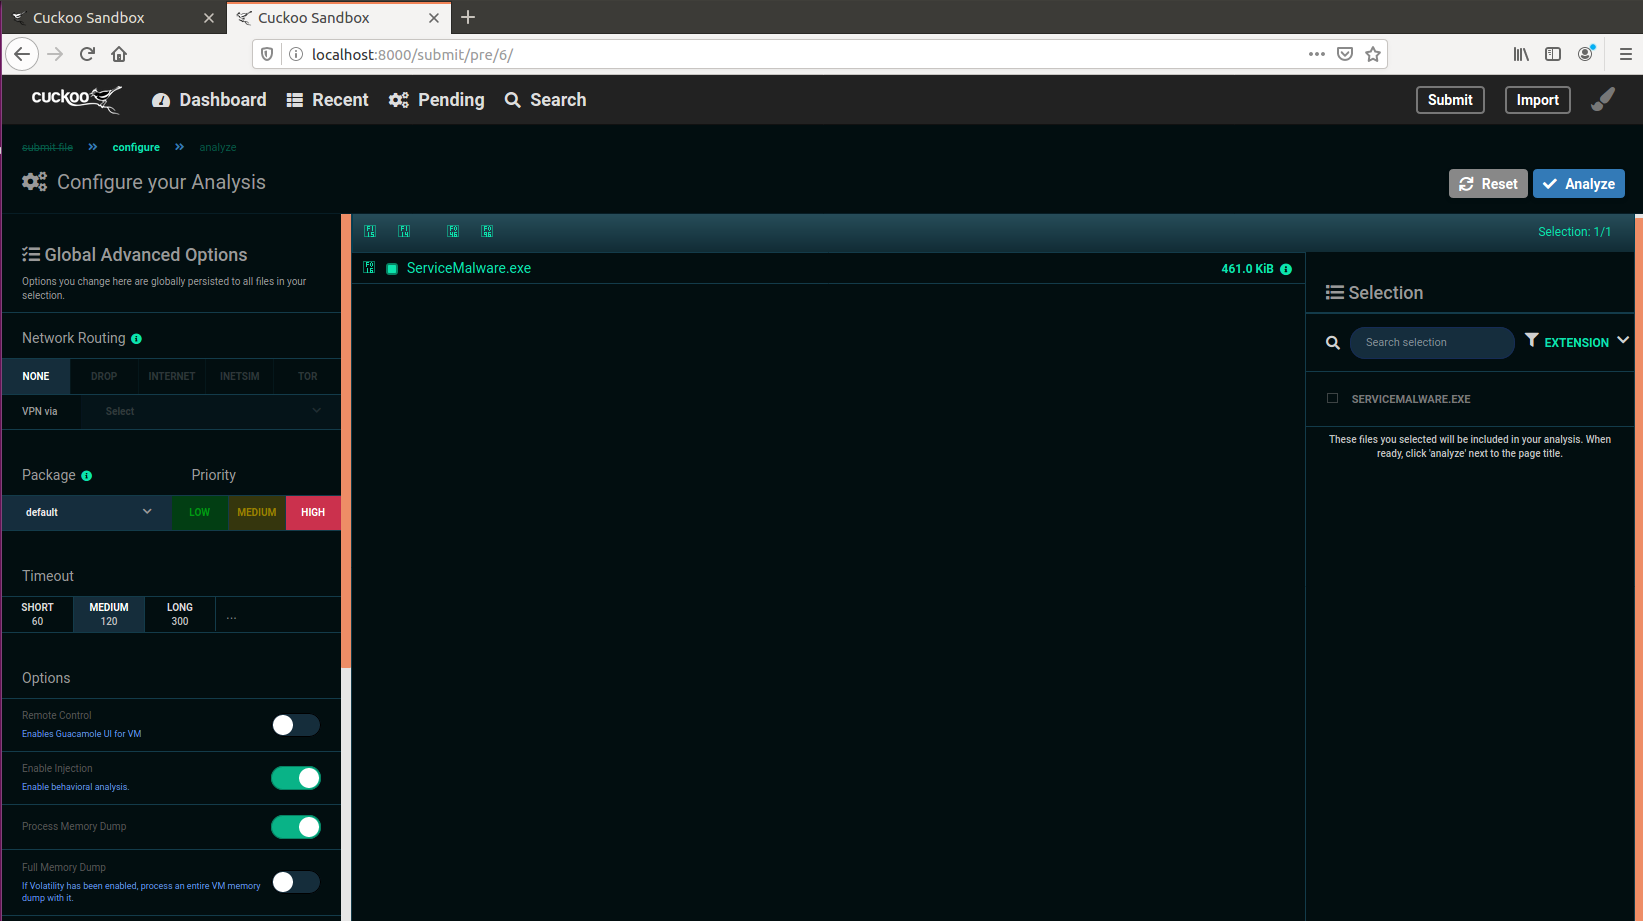
Figure 3.1 – Analysis Configuration Page
- The analysis should take some time depending on different factors, but after that you will see that your report is ready, so click on the report URL and it should bring you to the Summary page. An example could be seen in figure 3.2.
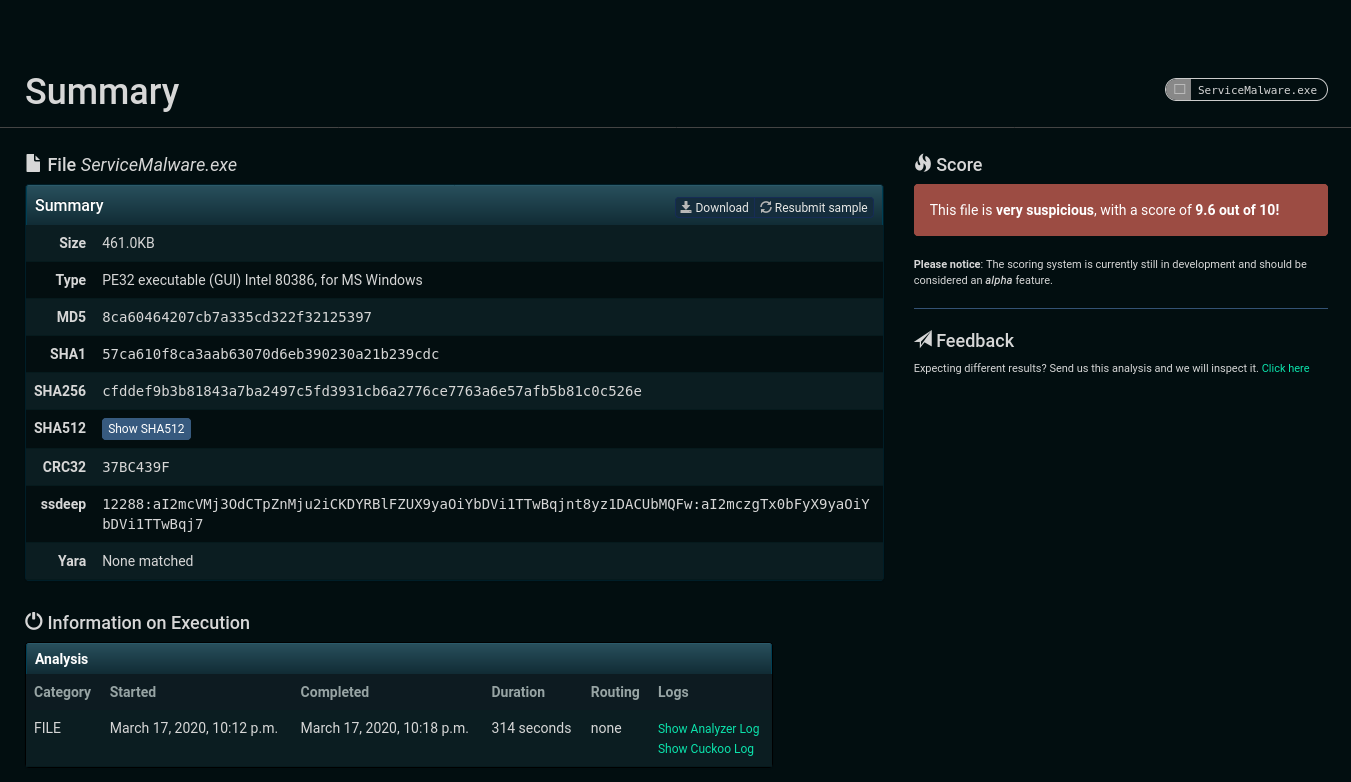
Figure 3.2 – Analysis Summary
- If you check below Signature as seen in figure 3.3, you should see a couple of the signatures that Cuckoo determined from the analysis. Please note that these could be different from one sample to another, again I’m only showing a sample.
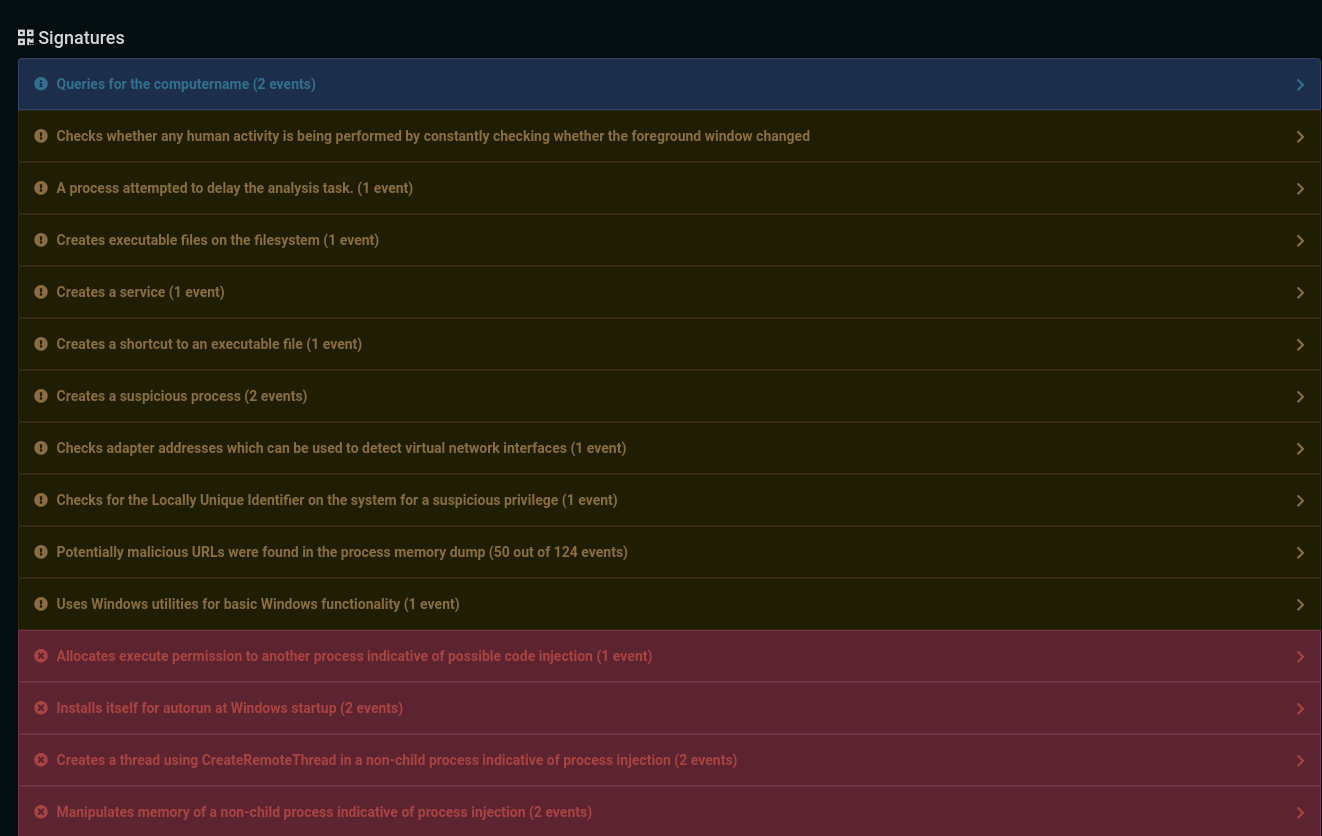
Figure 3.3 – Signatures Found
- We can also check the Screenshots section as seen in figure 3.4, which lists a what happened when this sample was run by Cuckoo. We can also see some network activity with domains that were observed (I’m sure one of those domains is known to my students LOL).

Figure 3.4 – Screenshots and Network Activity Observed
- Now some might be saying where is the Moloch part that you said it’s integrated? Well just click on any of the URLs or IP Addresses and it will send you to Moloch with a filter applied for that Domain/IP Address as seen in figure 3.5.
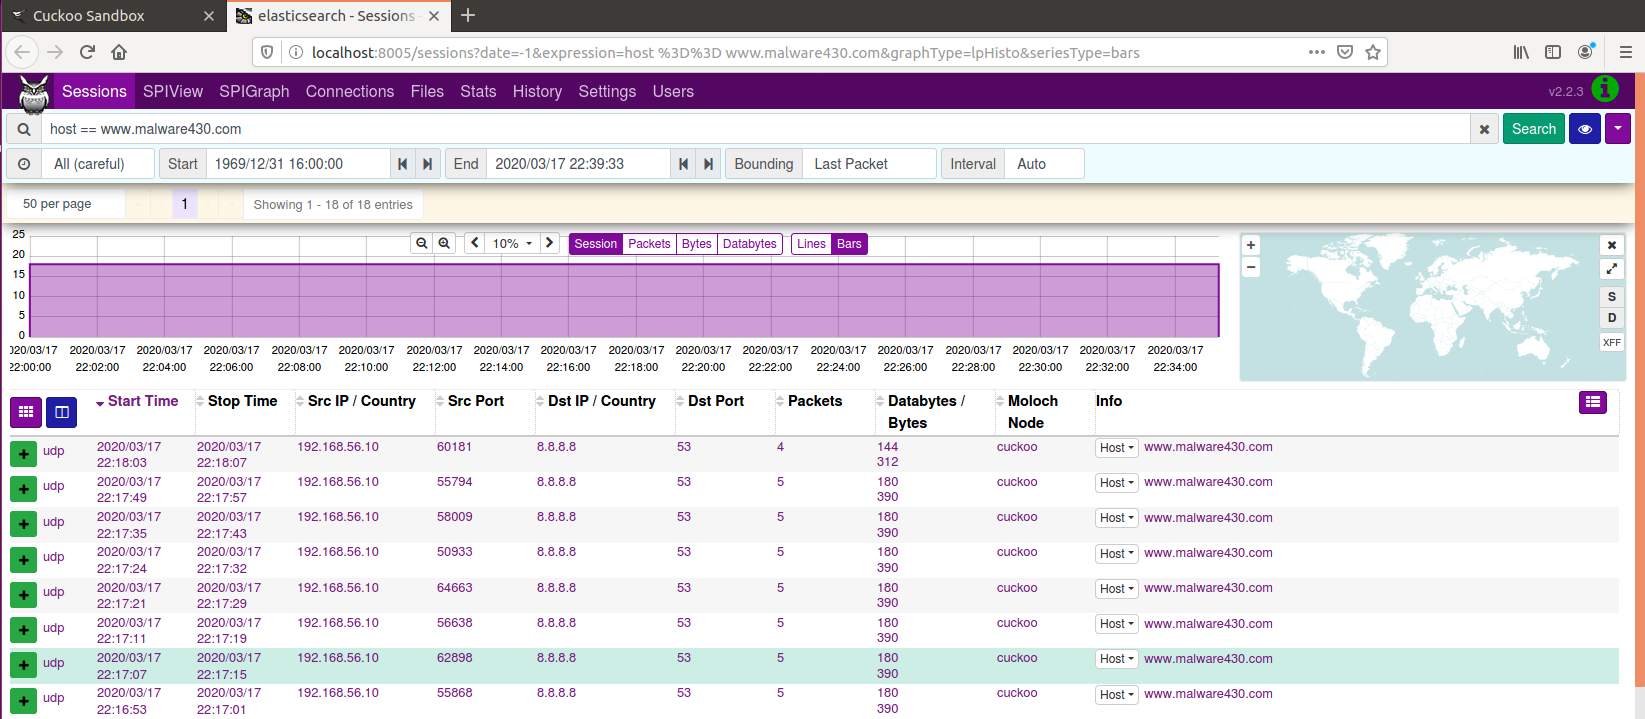
Figure 3.5 – Moloch Interface with Filter Applied
Note: that domain does not exist, but my students know what it is :D
- If you navigate on your left to the Static Analysis tab and then take a look of all the information extracted automatically for you. If you scroll down to the bottom, you should see all of the libraries and the APIs used by the sample. An example could be seen in figure 3.6.
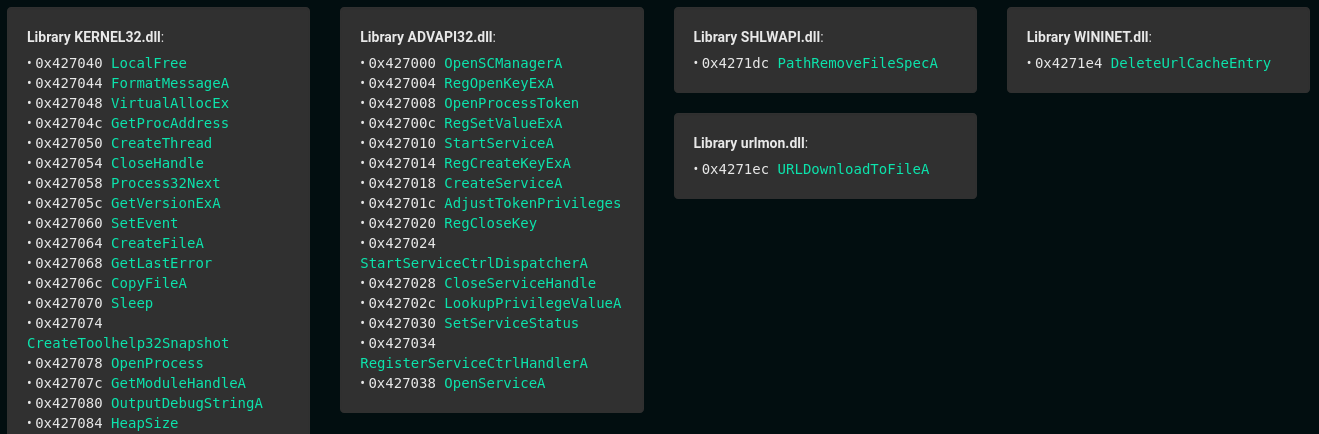
Figure 3.6 – Libraries and APIs used by Sample
Let’s check two more things and then we end this post.
- If you go to the Behavioral Analysis page, you should be able to see the behavior recorded by Cuckoo for you as seen in figure 3.7. The buttons default, registry, file, network, etc allow you to focus on one specific artifact, which is very useful for focusing in specific artifacts.
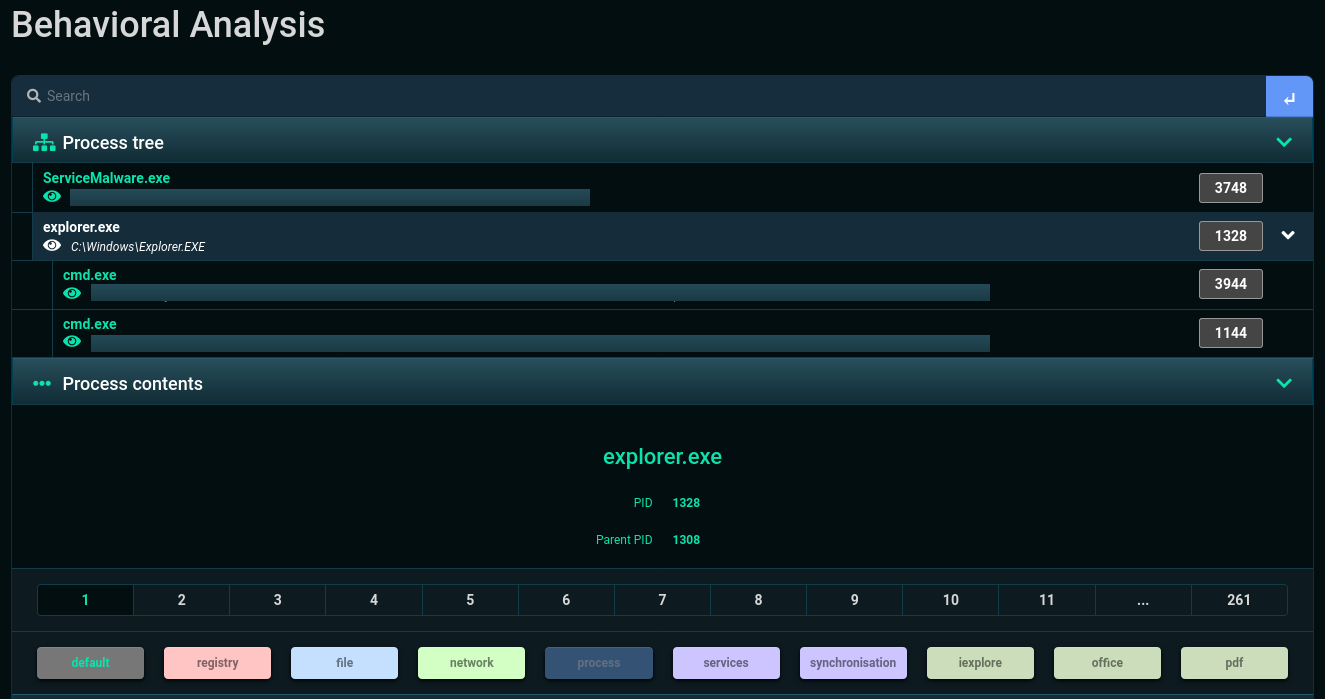
Figure 3.7 – Behavioral Analysis of Sample
- Now, if let’s say you want to delete the sample, all you need to do is go to the Options page and click the Delete button, as seen in figure 3.8. This will delete the sample from your Cuckoo Sandbox repository (your call!).
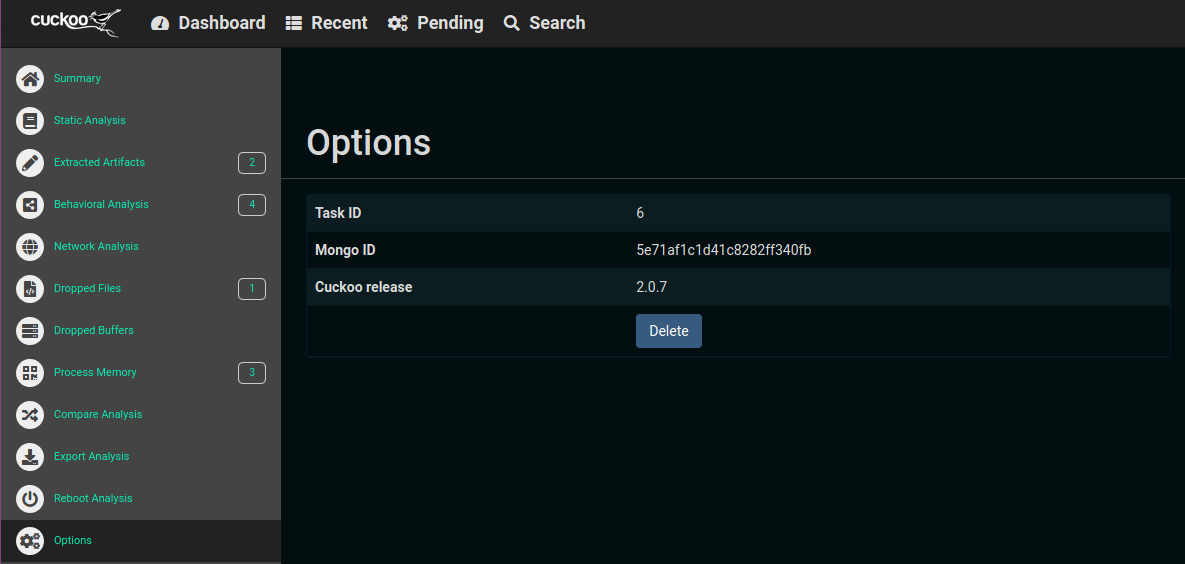
Figure 3.8 – Deleting the Sample
I just wanted to mention one important note, that this Sandbox is definitely helpful, but this is not a bullet proof solution, and figure 4.1 shows a sample that I created which actually bypassed detection! Therefore, please use it as a first phase or whatever, but not as a final answer to “Is this file malicious or not”!
 Figure 4.1 – Malicious Sample that Bypassed Detection
And that’s it folks, you have your Cuckoo VM up and running and you know what to do with it now. Hope it becomes useful to you and if you have any feedback, I would love to hear it.
Download URL (shared again in case you missed it): here